Complete Guide to Sheets, Tabs, & Structure
A Microsoft Excel Workbook serves as a binder, while individual Worksheets (or sheets) act as the pages inside it. Efficiently organizing, structuring, and navigating worksheets is essential for building clean, professional, and scalable spreadsheets.
Video Explanation
This comprehensive guide covers everything from basic worksheet operations to advanced management techniques like multi-sheet grouping, color coding, and structural protection.
1. Structure of Worksheets & Workbook Layout
Every new workbook starts with at least one worksheet (typically named Sheet1). Worksheets ar\e managed via the Sheet Tab Bar located at the bottom of the screen, just above the Status Bar.
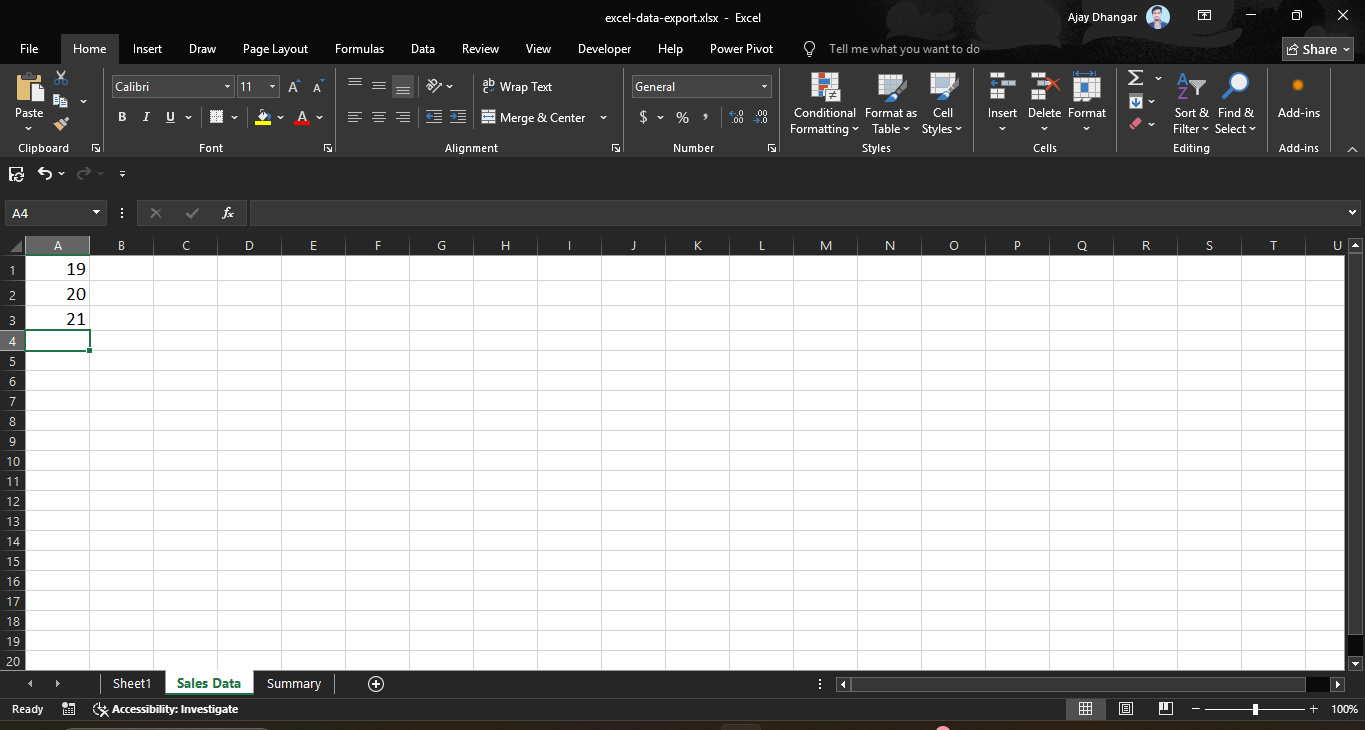
Key Elements of the Sheet Tab Bar:
- Sheet Tabs: Individual tabs representing each active worksheet.
- Add Sheet Button (
+): Quickly inserts a new blank sheet to the right of the active tab. - Tab Navigation Arrows (
|<<>>|): Scroll left or right when a workbook contains more sheet tabs than can fit on screen. - Horizontal Scroll Bar Separator: Drag the vertical split bar between the sheet tabs and the horizontal scroll bar to expand or contract the sheet tab view area.
2. Basic Worksheet Operations
Creating New Worksheets
- Mouse Method: Click the plus icon (
+) next to the existing sheet tabs. - Ribbon Method: Go to Home → Cells group → click Insert → select Insert Sheet.
- Keyboard Shortcut: Press
Shift+F11(orAlt+Shift+F1).
Renaming Worksheets
Clear, descriptive sheet names prevent confusion and improve formula readability (e.g., =SUM('Q1 Sales'!B2:B10) instead of =SUM(Sheet2!B2:B10)).
- Double-click the target sheet tab.
- Type the new name.
- Press
Enter.
- Sheet names cannot exceed 31 characters.
- Names cannot contain special characters:
\,/,?,*,:,[, or]. - Names cannot be left blank or match an existing sheet in the same workbook.
Reordering Worksheets
- Drag-and-Drop: Click and hold any sheet tab, then drag it horizontally to the desired position. A small downward arrow indicator guides placement.
- Move Menu: Right-click the sheet tab → select Move or Copy... → choose the target position in the list → click OK.
Right-Click Tab -> Move or Copy:
+-------------------------------------------------------+
| Move or Copy                                         X |
+-------------------------------------------------------+
| Move selected sheets to book:                         |
| [ current-workbook.xlsx                             v] |
|                                                       |
| Before sheet:                                         |
|   Sheet1                                              |
|   Sales Data                                          |
|   Summary                                             |
|   (move to end)                                       |
|                                                       |
| [ ] Create a copy                                     |
|                                                       |
|                     [  OK  ]     [ Cancel ]           |
+-------------------------------------------------------+
Copying & Duplicating Worksheets
Creating exact copies of a formatted sheet template speeds up monthly or regional reporting.
- Fast Drag Shortcut: Hold the
Ctrlkey, click the sheet tab, and drag it to the side. A small+icon appears on the cursor indicating a duplicate is being created. - Dialog Method:
- Right-click the sheet tab and select Move or Copy....
- Select the target location from the Before sheet box.
- Check the Create a copy checkbox.
- Click OK.
Deleting Worksheets
- Right-Click Method: Right-click the sheet tab and select Delete.
- Ribbon Method: Go to Home → Cells group → Delete → Delete Sheet.
Deleting a worksheet cannot be undone using Ctrl + Z. If a sheet contains data, Excel displays a permanent deletion warning prompt.
3. Visual Organization & Tab Colors
Applying background colors to sheet tabs creates visual grouping across complex workbooks (e.g., Green for Financial Statements, Blue for Raw Data, Orange for Dashboards).
+----------------------------------------------------------------------+
| [ Raw_Data ]  [ Data_Clean ]  [ P&L_Summary ]  [ KPI_Dashboard ] (+) |
| (Grey Tab)    (Grey Tab)      (Green Tab)      (Blue Tab)            |
+----------------------------------------------------------------------+
Changing Tab Color:
- Right-click the sheet tab.
- Hover over Tab Color.
- Choose a theme color, standard color, or click More Colors....
- To remove color, select No Color.
4. Hiding & Unhiding Worksheets
To declutter workbooks or conceal background calculations and lookup tables, you can hide worksheets from view without deleting their data or breaking formulas.
Hiding a Sheet:
- Right-click the sheet tab you wish to conceal.
- Click Hide.
Unhiding a Sheet:
- Right-click any visible sheet tab.
- Select Unhide....
- In the dialog list, select the hidden sheet you want to display.
- Click OK.
Unhide Dialog Box:
+-------------------------------------------------------+
| Unhide                                               X |
+-------------------------------------------------------+
| Unhide sheet:                                         |
| +---------------------------------------------------+ |
| | Ref_Tables                                        | |
| | Background_Calculations                           | |
| | Archived_2025                                     | |
| +---------------------------------------------------+ |
|                                                       |
|                     [  OK  ]     [ Cancel ]           |
+-------------------------------------------------------+
5. Working with Multiple Sheets (Sheet Grouping)
When you select multiple sheets simultaneously, Excel enters Group Mode. Any edit, formatting change, row insertion, or formula typed into the active sheet automatically replicates across all grouped sheets at the exact same cell positions.
How to Group Worksheets:
- Adjacent Sheets: Click the first sheet tab, hold
Shift, and click the last sheet tab. - Non-Adjacent Sheets: Click the first sheet tab, hold
Ctrl, and click individual sheet tabs to select them selectively. - All Sheets: Right-click any sheet tab and choose Select All Sheets.
When sheets are grouped, the word [Group] appears next to the file name in the Excel Title Bar at the top of the screen.
+-----------------------------------------------------------------------------------+
| [QAT]         Annual-Report-2026.xlsx [Group] - Excel                             |  <- Group Mode Indicator
+-----------------------------------------------------------------------------------+
| File  Home  Insert  Draw  Page Layout  Formulas  Data  Review  View  Developer    |
+-----------------------------------------------------------------------------------+
|  1 | Region       Q1 Target     Q1 Actual                                         |  <- Editing here updates
|  2 | North        $10,000       $12,500                                           |     all grouped sheets
+-----------------------------------------------------------------------------------+
| [ Jan ] [ Feb ] [ Mar ] (All 3 selected/grouped)                                  |
+-----------------------------------------------------------------------------------+
How to Ungroup Worksheets:
- Click on any single sheet tab outside the group.
- Or right-click any grouped tab and select Ungroup Sheets.
Always ungroup sheets immediately after completing your multi-sheet edit. Forgetting you are in [Group] mode can lead to accidental overwriting of critical data across multiple sheets.
6. Sheet Protection & Structure Lock
To prevent users from adding, deleting, renaming, hiding, or moving worksheets, protect the workbook structure.
Locking Workbook Structure:
- Go to the Review tab on the Ribbon.
- Click Protect Workbook in the Protect group.
- Ensure Structure is checked.
- (Optional) Enter a password to prevent unauthorized unlocking.
- Click OK.
+-------------------------------------------------------+
| Protect Structure and Windows                       X |
+-------------------------------------------------------+
| Protect workbook for:                                 |
| [X] Structure                                         |
| [ ] Windows                                           |
|                                                       |
| Password (optional):                                  |
| [ **********                                        ] |
|                                                       |
|                     [  OK  ]     [ Cancel ]           |
+-------------------------------------------------------+
Once enabled, sheet tab operations like Insert, Delete, Rename, Move, Hide, and Tab Color will be greyed out in the context menu.
7. Keyboard Shortcuts Quick Reference
Boost your sheet navigation speed with these essential keyboard shortcuts:
| Action | Windows Shortcut | Mac Shortcut |
|---|---|---|
| Next Sheet (Right) | Ctrl + Page Down | Option + Right Arrow (or Fn + Ctrl + Down) |
| Previous Sheet (Left) | Ctrl + Page Up | Option + Left Arrow (or Fn + Ctrl + Up) |
| Insert New Sheet | Shift + F11 | Shift + F11 |
| Select Adjacent Sheets | Shift + Click Tab | Shift + Click Tab |
| Select Non-Adjacent Sheets | Ctrl + Click Tab | Command + Click Tab |
| Duplicate Sheet Drag | Ctrl + Drag Tab | Option + Drag Tab |
| Open Sheet Context Menu | Shift + F10 (on tab) | Shift + F10 (on tab) |
Summary Best Practices
- Use descriptive, concise sheet names (under 31 chars) and avoid spaces in names if writing complex formulas.
- Color-code tabs by category (e.g., raw data inputs vs. final calculation outputs).
- Hide background reference tables to keep the user interface simple for stakeholders.
- Use Sheet Grouping (
Shift/Ctrl+ Click) to apply standard formatting across uniform monthly or quarterly tabs. - Remember to ungroup sheets immediately after multi-tab updates to prevent accidental data loss.
- Enable Protect Workbook Structure before distributing financial models or shared templates.