introduction to spring mvc
Spring MVC Tutorial
Spring MVC is a Java framework used for building web applications. It implements the Model-View-Controller (MVC) design pattern and provides features like Inversion of Control and Dependency Injection.
Spring Web Model-View-Controller
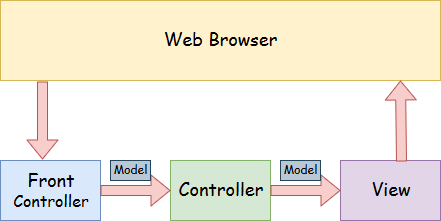
- Model: Contains the data of the application. It can be a single object or a collection of objects.
- Controller: Contains the business logic of the application. Marked with the
@Controllerannotation. - View: Represents the provided information in a particular format. JSP+JSTL is commonly used for creating view pages.
Front Controller
In Spring Web MVC, the DispatcherServlet class acts as the front controller, managing the flow of the Spring MVC application.
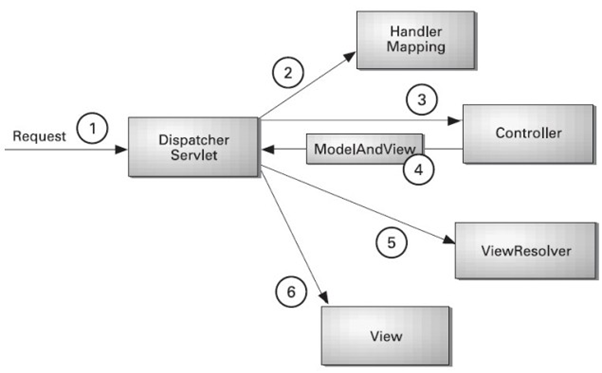
- All incoming requests are intercepted by the
DispatcherServlet. - The
DispatcherServletforwards the request to the appropriate controller. - The controller returns a
ModelAndViewobject. - The
DispatcherServletinvokes the specified view component.
Advantages of Spring MVC Framework
- Separate roles: Each role is fulfilled by a specialized object, promoting better code organization.
- Lightweight: Utilizes a lightweight servlet container for application development and deployment.
- Powerful Configuration: Provides robust configuration for both framework and application classes.
- Rapid Development: Facilitates fast and parallel development.
- Reusable Business Code: Allows the reuse of existing business objects.
- Easy to Test: Supports the creation of JavaBeans classes for easy testing.
Spring Web MVC Framework Example
Required Jar files or Maven Dependency
If using Maven, add the following dependencies to the pom.xml file:
<!-- Spring Web MVC -->
<dependency>
    <groupId>org.springframework</groupId>
    <artifactId>spring-webmvc</artifactId>
    <version>5.1.1.RELEASE</version>
</dependency>

<!-- Servlet API -->
<dependency>
    <groupId>javax.servlet</groupId>
    <artifactId>servlet-api</artifactId>
    <version>3.0-alpha-1</version>
</dependency>
Create the Controller Class
package com.javatpoint;

import org.springframework.stereotype.Controller;
import org.springframework.web.bind.annotation.RequestMapping;

@Controller
public class HelloController {
    @RequestMapping("/")
    public String display() {
        return "index";
    }
}
Provide the entry of controller in the web.xml file
<servlet>
    <servlet-name>spring</servlet-name>
    <servlet-class>org.springframework.web.servlet.DispatcherServlet</servlet-class>
    <load-on-startup>1</load-on-startup>
</servlet>
<servlet-mapping>
    <servlet-name>spring</servlet-name>
    <url-pattern>/</url-pattern>
</servlet-mapping>
Define the bean in the XML file (spring-servlet.xml)
<beans xmlns="http://www.springframework.org/schema/beans"
    xmlns:xsi="http://www.w3.org/2001/XMLSchema-instance"
    xmlns:context="http://www.springframework.org/schema/context"
    xmlns:mvc="http://www.springframework.org/schema/mvc"
    xsi:schemaLocation="
        http://www.springframework.org/schema/beans
        http://www.springframework.org/schema/beans/spring-beans.xsd
        http://www.springframework.org/schema/context
        http://www.springframework.org/schema/context/spring-context.xsd
        http://www.springframework.org/schema/mvc
        http://www.springframework.org/schema/mvc/spring-mvc.xsd">

    <!-- Provide support for component scanning -->
    <context:component-scan base-package="com.javatpoint" />

    <!--Provide support for conversion, formatting, and validation -->
    <mvc:annotation-driven/>

    <bean id="viewResolver" class="org.springframework.web.servlet.view.InternalResourceViewResolver">
        <property name="prefix" value="/WEB-INF/jsp/"></property>
        <property name="suffix" value=".jsp"></property>
    </bean>
</beans>
Display the message in the JSP page (index.jsp)
<html>
<body>
<p>Welcome to Spring MVC Tutorial</p>
</body>
</html>
In this tutorial, we've seen how to set up a basic Spring MVC application. With this setup, incoming requests are handled by the DispatcherServlet, which maps them to the appropriate controller. The controller then returns a view, which is rendered to the user.
Create Multiple Controllers
Let's extend our example to include multiple controllers, each handling different requests.
-
Add Dependencies to
pom.xmlEnsure that the Spring Web MVC dependency is included in the
pom.xmlfile. -
Create the Request Page (
index.jsp)Create a simple JSP page containing links to different controllers.
<html>
<body>
<a href="hello1">Spring MVC</a> ||
<a href="hello2">Spring Boot</a>
</body>
</html> -
Create Controller Classes
We'll create two controller classes, each handling a different request.
HelloController.javapackage com.javatpoint;
import org.springframework.stereotype.Controller;
import org.springframework.web.bind.annotation.RequestMapping;
@Controller
public class HelloController1 {
@RequestMapping("/hello1")
public String display() {
return "viewpage1";
}
}hellocontroller2.javapackage com.javatpoint;
import org.springframework.stereotype.Controller;
import org.springframework.web.bind.annotation.RequestMapping;
@Controller
public class HelloController2 {
@RequestMapping("/hello2")
public String display() {
return "viewpage2";
}
} -
Provide the Entry of Controllers in
web.xmlEnsure that the
DispatcherServletis configured to map requests correctly. -
Define the Bean in the XML File (
spring-servlet.xml)Define the view resolver to map logical view names to physical JSP files.
-
Create the View Pages
Create JSP pages corresponding to each controller.
viewpage1.jsp
<html>
<body>
<p>Welcome to Spring MVC Tutorial</p>
</body>
</html>
viewpage2.jsp
<html>
<body>
<p>Welcome to Spring Boot Tutorial</p>
</body>
</html>
By following these steps, you can create a Spring MVC application with multiple controllers, each handling specific requests and returning corresponding views.
This concludes the extended example of a Spring MVC framework. You can now deploy the project and start the server to see the application in action.